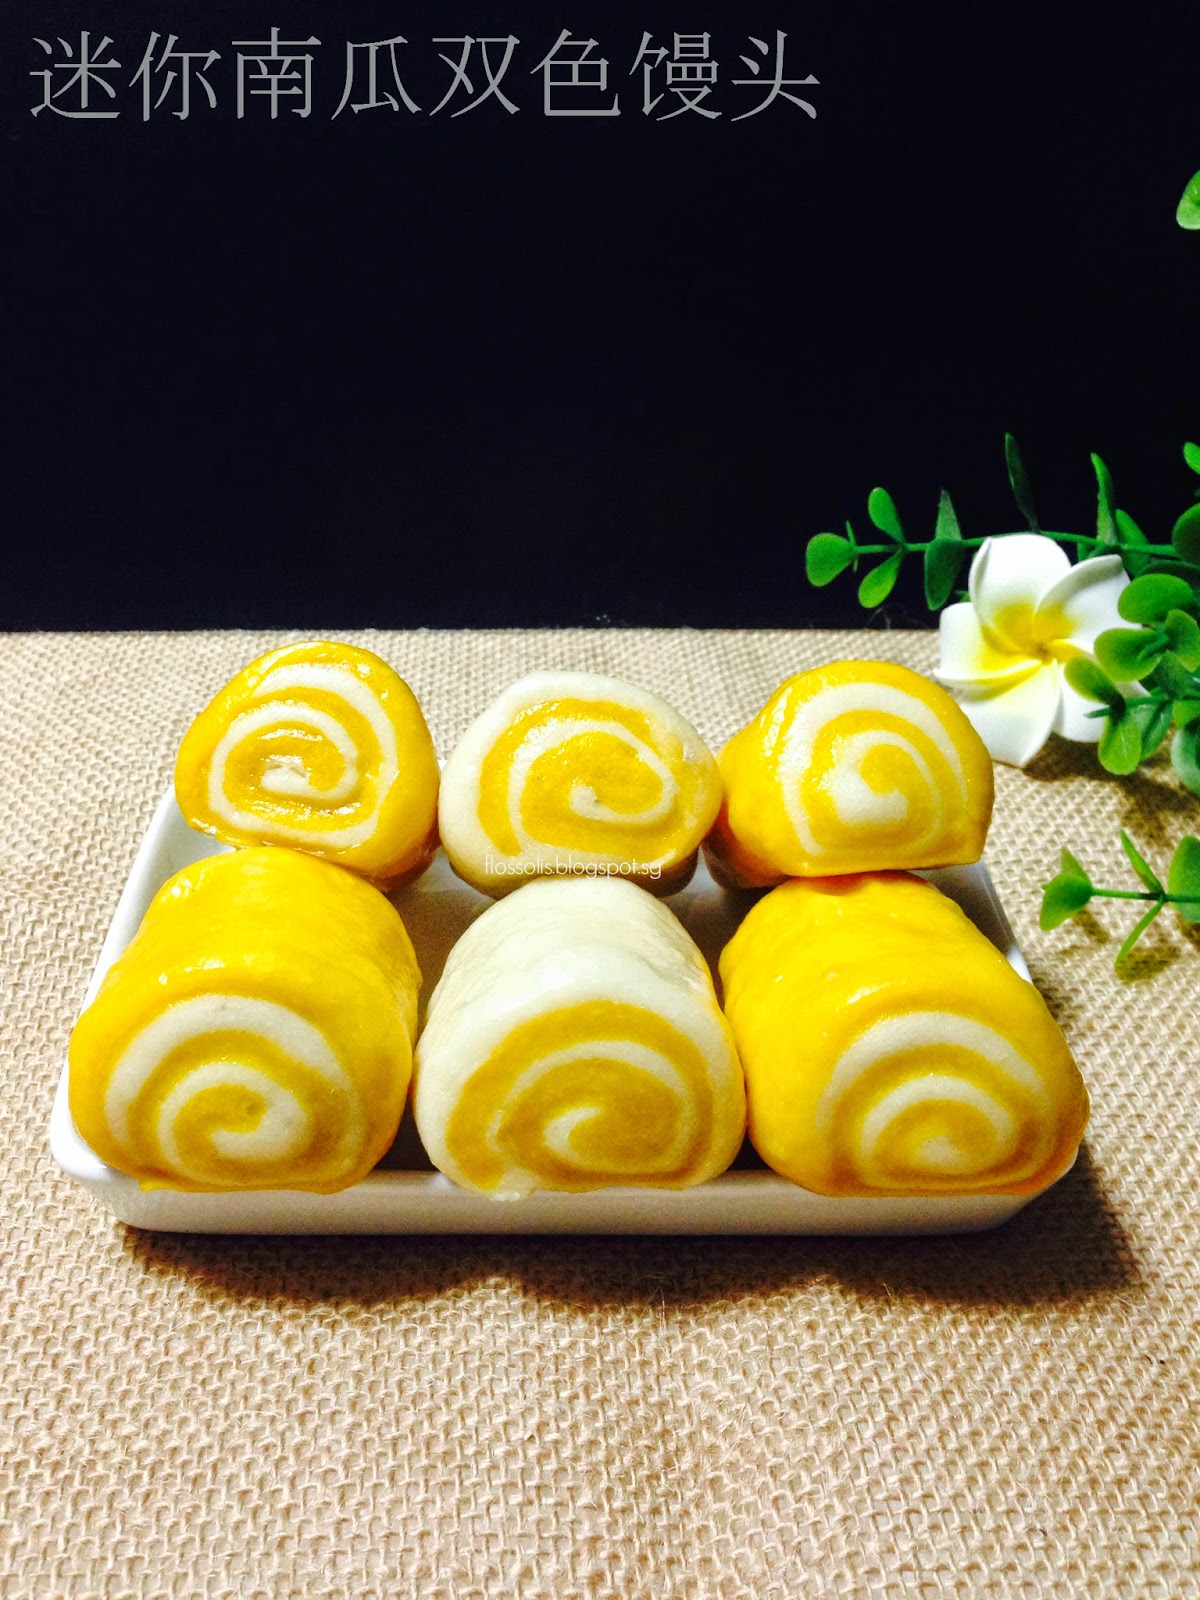
Showing posts with label 馒头包子. Show all posts

Sunday, October 26, 2014

开心的~金瓜莲蓉包 Pumpkin Lotun Bun

难得出炉的包子光滑样。
没有皱皮看了很开心。

中秋节时,做香化饼剩下了一些莲蓉。
借机一次过清完。


材料:

(A)
即溶酵母 - 2.5g(1/2t + 1/8t)
清水 - 50g

(B)
包粉 - 250g
糖 - 25g (我用赤砂糖)
盐 - 1g (我用海盐)
金瓜泥 - 100g
椰油 - 10g

馅料:市售莲蓉

Ingredients:
(A) 
2.5g Instant Yeast
50g Plain Water

(B)
250g Flour
25g Sugar (I used brown sugar)
1g Salt ( I used Sea Salt)
100g Pumpkin Puree
10g Coconut Oil

Filling: Lotus Paste


做法 Method:
1)材料(A)的水加入即溶酵母拌均匀至完全溶解,倒入材料(B)里拌均匀,再揉成表面光滑的面团,滚圆休面5分钟,然后分割所需份量再搓圆。
Ingredient A: Dissolve instant yeast in water.  Add it in ingredients B and combine well, knead until smooth dough forms. Rest for 5 minutes. Divide into small portions. Roll into ball.

2)用杆面棍杆成中间厚旁边薄的圆形,加入莲蓉馅,包裹成圆形,放在油纸上,直接放进蒸笼里进行最后发酵20-30分钟,视当时室温的温度而定。
Roll the small ball into a flat disc, thin at the border and thick in the center. Wrap in lotus paste Place the bun on baking paper, on the rack for steaming, let it rise for 20-30 minutes.


3) 发酵完成后,水滚起算大火蒸15分钟,蒸好后稍微开一点盖,让其透一透热即可。
After proofing,  steam the buns for 15 minutes under boiling water. When time up, wait for 5 minutes, leave a small opening. Wait for another 3 minutes then open the lid.


This post is linked to the event Little Thumbs Up (Oct 2014 Event: PUMPKIN) organised by Zoe (Bake for Happy Kids) and Mui Mui (My Little Favourite DIY) and hosted by Eileen (Eileen's Diary).


&;


I'm joining Best Recipes for Everyone October 2014 Event Theme: Bun in My Hot Steamer hosted by Fion of XuanHom's Mom.

Thursday, October 23, 2014

全麦刈包 Wholemeal Flat Bun

原来这个字“刈” 读成 yi。我还以为这个叫做“割包”。哈哈。。

某日,我们把这些刈包当成晚餐,除了包入焖香菇素扣肉的馅外,我们还包入鸡蛋、芝士和乌达。杂七杂八地乱加馅儿。一家人吃得津津有味的也很开心。无所谓的随意就是那么自在。

Carol 的这款刈包好吃。虽然加了全麦面粉,它吃起来口感不会干干的,相当蓬松。可惜那天晚餐,我们太馋嘴了,只能随意咔嚓几张图。


食谱取自Carol


材料 Ingredients:

中筋面粉250克、全麦面粉50克、鸡蛋1颗、清水130cc、速发酵母1/2茶匙、砂糖15克 (我用赤砂糖、橄榄油20克(我用葡萄籽油)、盐1/8茶匙。

夹层抹油:橄榄油适量 (我用葡萄籽油替代)

250g All Purpose Flour, 50g Wholemeal Flour, 1 egg, 130cc water, 1/2 tsp Instant  Yeast, 15g Fine Sugar (I used Brown Sugar), 20g Olive Oil (I substitute with Grapeseed Oil), 1/8tsp salt


做法 Method:

1)将所有材料放入缸盆中,倒入清水慢慢搅拌搓揉成为一个团状。(清水保留10cc视面团状态慢慢添加。)继续搓揉8-10分钟成为光滑不粘手的面团。
Combine all ingredients together, add in water gradually. Continue to knead until smooth dough form.

2)放入抹少许油的盆中,喷些水,表层盖上湿布或保鲜膜发酵1.5个小时至2倍大。
Place the dough in a greased bowl, cover it with wet cloth or cling wrap, allow the dough to rise for 1.5 hours or till double in size.

3)发酵完后,把面团移出到桌面,面团表面撒上10g的中筋面粉,再把它搓揉进面团中揉成光滑面团。再平均分割成12份。
After rising, remove the dough from bowl, place it on the table, punch down and add in 10g flour, continue to knead until smooth dough form. Then divide the dough proportionally (12 portions).

4)把小面团压扁,用擀面杖擀成椭圆形。光滑面朝下,朝上的那一面涂上一层油,再对折。
Flatten the small piece of dough and rolled into oval shape.Brush with oil and fold into half.

5)排在蒸笼上,再发40分钟。
Arrange the bun in steamer and allow to rise for 40 minutes.

6)中火蒸12分钟,就快到的最后2分钟,锅开小缝,时间到就熄火。放置保持7-8分钟后,移开再保持3分钟再慢慢打开锅盖。
Steam it with middle-high heat for 12 minutes. In last 2 minutes, leave a little opening. Turn off the heat when times up. Remove the steamer from stove after 7 -8 minutes. Then wait for another 3 minutes then open the lid.

7)包入内馅即可享用。
Serve hot with any desire filling.


I'm joining Best Recipes for Everyone October 2014 Event Theme: Bun in My Hot Steamer hosted by Fion of XuanHom's Mom.

Friday, October 17, 2014

越战越勇~亚麻籽黑芝麻馒头 (Flaxseed Black Sesame Mantou)

这一次比上一次进步了。
从不满意的地方着手找答案,
相信下一次一定会更好的。
肯定的是,这个馒头很美味。
加了黑芝麻馅别有一番风味。


材料 Ingredients:

中筋面粉 250克
细砂糖 30克 (我用吃砂糖)
即溶酵母粉 2克
水 130克
沙拉油 5克 (我用葡萄籽油)
黑芝麻粒 12克 (我用亚麻籽)

250g All Purpose Flour
30g Fine Sugar (I replaced with Brown Sugar)
2g Instant Yeast
130g Water
5g Salad Oil (I replaced with Grapeseed Oil)
12g Black Sesame (I replaced with Flaxseed)


内馅 Filling:

黑芝麻粉 25克
糖粉 10克

25g Black Sesame Flour
10g Sugar Powder

做法 Method:

1)除了黑芝麻粒,全部材料混合打成三光,接着加入黑芝麻粒,慢速搅匀。面团松弛3-5分钟。
Beat all the ingredients together (except black sesame) until it forms a smooth dough. Then add in black sesame, using slow speed to mix well.  Let it rest for 3-5 minutes.

2)内馅(黑芝麻粉和糖粉)混合备用。
Filling: Combine black sesame flour and sugar powder together. Set aside.

3)擀面团让气泡被压出,再将面团擀成成长方形,表面抹上少许水,铺上内馅,用手压一压,让粉类和面团紧密黏合,才不会松散。
Punch down and roll the dough to expel the air. Roll it out flat into a rectangle shape. Brush the dough with water, sprinkle the filling on it, press lightly.

4)面团卷起,再以个人喜好,切成小等份。
Roll it up and cut into small portion.

5)最后发酵约20分钟,入锅蒸18分钟。蒸好后,焖五分钟才慢慢开盖。
Let it proof for approximately 20 minutes, steam it for 18 minutes. Do not open the lid immediately. Wait for 5 minutes then open the lid.


 I'm joining Best Recipes for Everyone October 2014 Event Theme: Bun in My Hot Steamer hosted by Fion of XuanHom's Mom.


Tuesday, October 14, 2014

再接再厉~白神鲜奶馒头 Fresh Milk Mantou

前些日子蓝色小厨在博文中提到了“只要每一天都超越昨天的自己,这样就够了!” 你知道吗,昨晚当我打开锅盖的那一瞬间,看到这些仍然是有点皱皮的馒头,我确实有点失望,可思绪立刻又想到了小厨说的超越昨天的自己,失望的心马上感觉好起来。

这一次在制作上特别用心。在谷歌到处偷师,记下了不少他人的心得分享,试图找到馒头皱皮的答案。所以这一次在第一次发酵和排气特别留意。第一次发酵跟着孟老师的做法,只是松弛5分钟就开始擀面。之前我觉得我的馒头也许是过度发酵所以皱皮严重。再来上一次面团的空气也好像没有完全被压出来也导致皱皮。所以这一次在擀面上也特别下功夫。

当然做馒头的食谱很多。不同的食谱不同的做法。很多时候得靠自己去实践、拿捏、摸索,方能找到自己所谓的满意。

至于白神酵母,它是日本秋田县世界自然遗产「白神山地」的野生酵母。它的发酵力强保湿度也佳。据说抗冻力也强,即使把面团冷冻起来酵母生命力也不会减弱。我用的这款酵母不是速酵,所以使用前必须醒酵母~用温水来泡。酵母放进水里后不可马上搅拌,容易结块不易搅动。要放3分钟左右酵母吸水了才搅拌,再静置一会儿就可以使用了。使用的成分是面粉的2%,加3倍的温水泡开。

这个牛奶馒头弹力不错哦!白神酵母有种天然的果香味,温热时剥开馒头用力闻一下,感恩大自然赐予的美味。


食谱参考Mickey's Life

材料 Ingredient:

面粉 300g
300g All Purpose Flour
鲜奶 (温的)160g
160g Warm Fresh Milk 

白神酵母 6g (用三倍的温水也就是18g融化)
6 g Shirakami Kodama Koudo Dry Yeast ( use 18g of warm water to dissolve)
 
赤砂糖 20g
20g Brown Sugar

做法 Method:

1)融化酵母静置15分钟。
Dissolve the yeast and set aside for 15 minutes.
2)所有材料一起搓揉/搅拌至光滑面团。
Mix all ingredients to form a smooth dough.
3)松弛5分钟。
Let it rest for 5 minutes.
4)用擀面丈把空气压出来,再卷起来,切段。排放在蒸笼发酵30分钟。
Punch down and roll the dough to expel and air. Roll the dough out flat into a rectangle shape. Roll back from the long side, cut into small pieces. Put on baking paper, arrange them into the steamer, let it proof for 30 minutes in warm steamer.

 5)冷水起蒸15分钟。最后5分钟,掀开小缝(用牙签)。熄火后,5分钟移开,三分钟后慢慢打开盖。
Add cold water in steamer, heat out steamer till water boils, steam it for15 minutes. In last 5 minute, use toothpick to leave a little opening. Turn off the heat, remove the steamer 5 minutes later (with the lid on). Wait for another 3 minutes, then open the lid.


I'm joining Best Recipes for Everyone October 2014 Event Theme: Bun in My Hot Steamer hosted by Fion of XuanHom's Mom.

Sunday, October 12, 2014

迷你南瓜双色馒头 (Mini Bi-color Pumpkin Bun)

无语。。
尽管锅盖已裹上布,也开小缝静置五分钟才打开锅盖。它。。就是不给脸,还是皱皮了。

没关系。。这次做得不好,继续摸索,下次再试。每样尝试,不管成败,都是我前进的动力。


星期五也做了小象馒头(不懂你觉得像象吗?:D )。蒸好后,口感不太像馒头。我怀疑也许是粉的问题。因为我用了可以做香港点心的面粉。以为做包子馒头应该没问题。还好不难吃,六只小象,还是被我们吃光了。我两岁的儿子还认出它是象,用了不太准确的音调说了“elephant"。听后也有少许安慰。


成品都不太满意所以食谱不多写了。
双色馒头食谱取自Jane


This post is linked to the event Little Thumbs Up (Oct 2014 Event: PUMPKIN) organised by Zoe (Bake for Happy Kids) and Mui Mui (My Little Favourite DIY) and hosted by Eileen (Eileen's Diary).


&


I'm joining Best Recipes for Everyone October 2014 Event Theme: Bun in My Hot Steamer hosted by Fion of XuanHom's Mom.

Monday, October 6, 2014

南瓜蝴蝶卷 Pumpkin Butterfly Bun

我一直觉得要把中式的点心做好绝对是非常考功夫的。鲜少在这方面磨练和下功夫的我,自认功力浅浅。

星期五晚上在奔向新柔长堤前,匆匆忙忙弄了这个蝴蝶卷。带着它,漂洋过海来陪我们去staycation。

原食谱没加糖,所以我在白面团里加了25克的糖。口感完全不会觉得甜。热呼呼时吃最棒了。


原食谱取自飞雪无霜
请参照原食谱里详细的制作图片。


材料 Ingredients: 

黄色面团:南瓜泥90克左右(我放100克)、中筋面粉150克,酵母2

Yellow Color Dough: 90g Pumpkin puree (I used 100g), 150g All Purpose Flour, 2g Instant Yeast
白色面团:水65克左右、面粉150克、酵母2克、赤砂糖25克

White Color Dough: 65g Water ( I used 75g), 150g All Purpose Flour, 2g Instant Yeast, 25g Brown Sugar


做法 Method:

1)南瓜泥中筋面粉酵母混合成黄色的光滑面团。
Mix all ingredients of pumpkin dough together to form a smooth dough.
 
2)另外,水、面粉、酵母和赤砂糖混合成白色的光滑面团。
Separately, mix all ingredients of plain dough to form a smooth dough.

3)将黄色面团白色面团分别擀成长片。
Roll out the plain dough and pumpkin dough separately, into rectangle shape.
 
4)白色长片放在黄色长片的上面,犹如卷瑞士卷般卷起。
Place the plain dough on top of the pumpkin dough, then roll up the dough, like Swiss roll.

5)切成2-3厘米的段,两个对着放在一起。用筷子压出蝴蝶形状
Cut the dough into small pieces. Put two doughs side by side. Use chopsticks to shape like a butterfly.
 
6)放在盛有温水的蒸笼上,醒30分钟,蒸15分钟左右。关火后三分钟取出。
Get ready a steamer with warm water, prove the butterfly dough on top the steamer for 30 minutes. Then steam over medium hear for 15 minutes. Turn off heat and let it sit for 3 minutes before open the lid. 


This post is linked to the event Little Thumbs Up (Oct 2014 Event: PUMPKIN) organised by Zoe (Bake for Happy Kids) and Mui Mui (My Little Favourite DIY) and hosted by Eileen (Eileen's Diary).


I'm joining Best Recipes for Everyone October 2014 Event Theme: Bun in My Hot Steamer hosted by Fion of XuanHom's Mom.

 &

I'm submitting this to "My Treasured Recipes #3 - Taste of Autumn (Oct/Nov 2014)"

Sunday, August 25, 2013

沙葛菜包

我家孩子的爸,
很爱吃菜包。
五天内我就做了这个菜包三次。

他不会觉得吃到怕,
我有点做到怕。
不过,他如果要再吃,
我还会再做啦。
因为难得他喜欢吃。
蛋糕那些有加鸡蛋的糕点他都不怎么喜欢。

还好这个包子,
我一次只做五粒,
所以很容易解决。
他一人一次就吃了三粒。
这一回也应了他的要求,
包皮薄,馅料多。


食谱取自Qi Qi In the House


材料:(以下是原食谱,我只做一半份量而已)

 (A) 300克香港粉(中筋面粉或水仙粉),1小匙速发酵母,适量盐,150克鲜奶,50克细糖,1 1/2大匙白油

(B) 1茶匙双倍发粉 (要用时加入一小匙水,搅匀)

做法:
1. 将所有材料(A) 混匀搓揉8-10分钟至光滑不黏手的面团。
2. 盖好发酵1小时或至两倍大。
3. 将发好的面团,加入(B),再将面团揉至光滑,休息15分钟。
4. 取出面团,进行分割。(50g一个)
5. 将小面团压扁,杆圆,包入馅料,捏紧。
6. 底部垫不沾纸,排入蒸笼内,再次发酵约45分钟。
7. 中大火蒸15分钟,蒸至10分钟后,稍微将锅盖开一小缝,但不要掀开盖子。
8. 时间到就熄火,保持盖子有一个小缝状态约7-8分钟。
9. 移开蒸锅再放置3分钟才打开盖子。
10. 这样蒸出来的包子才不会皱皮。


Friday, July 26, 2013

金瓜玉米包

当你遇到困难,老天却没有伸出援手,
是因为他相信你可以克服。

一直很想买蒸笼,可是到现在还没买。
 第一次做包子时,成品很松软。
但是没有post上来。
因为我是用大盘子隔水蒸七个包子。
结果蒸时,发到七个包子都相连在一起了。
我又懒得分两次来蒸。

这一次用HappyCall 28cm ceramic pot 的steamer分两次来蒸九个小包子。
蒸发时没有连在一起。
不过,这个ceramic pot 有排热气的洞洞,
所以熄火后锅盖的蒸气会滴在包子上。

看来得快快去买个蒸笼。


食谱参照Jess

~ 一下是原食谱一半的份量。 ~

材料 A

酵母  6g
糖  1/2茶匙
温水 75g

搅均匀,放置待发10分钟。


材料 B


包粉 250g
糖 4 汤匙
食油 4 汤匙
盐 少许
金瓜蒸软压成泥  75g

做法:
1。把全部材料B放入搅拌机内,才加入事先已准备好的材料A,搅拌成面团(约20分钟)。
2。取出,把面团分割成50g 小面团或相等的小面团。

3。包入馅料,然后整型。
4。大火蒸12-15分钟即可。


粟米奶油陷料
材料:
牛油  50g
普通面粉 30g
鲜奶 250ml
Custard Powder 30g
幼糖 60g
罐装奶油粟米 100g


做法:
1. 鲜奶和custard powder搅拌均匀,备用。
2. 用小火把牛油煮溶,加入普通面粉炒至香。
3. 慢慢加入(1)(分6次加入),搅拌成光滑的面团。
4. 加入幼糖和奶油粟米拌匀,离火待冷,放入冰箱冷藏4小时。(我冷藏到第二天晚上)

Thursday, July 11, 2013

牛奶黑糖双色馒头

今早宝贝去验血了。
真是万幸,她的血小板指数回升了很多。
从94 回升到269.
终于,脱离骨痛热的嫌疑。

早上验血时,她知道万一真的是骨痛热她就得去医院观察了。
所以,抽血时,她一直流着泪说,她不要去医院。
看了很心疼。

医生一说,不是骨痛热。
她紧绷的情绪突然松懈了。
雀跃的蹦跳起来说终于可以回去学校了,想朋友了。
是的,真是太好了。
也许是被她传染了。
现在轮到我伤风感冒。
鼻好塞哦!
拼命做家务,想出一身汗,应该会比较舒服。
平时做家务都会出很多汗。
偏偏这时候汗腺不争气。
只是那么一丁点的汗水,实在不过瘾。
热气憋着,热不起来。
这种感觉很不舒服。
身子疲惫,鼻子又塞。
躺也不是,坐也不是,就是塞。
决定做些什么,转移focus。

做了这个牛奶黑糖双色馒头。
我真的不太会切,应该切厚一点。
这个样子像包子。哈哈。

“我很丑可是我很温柔。
我很粗大可是我很柔软。”


黑馒头材料:
中筋面粉250
黑糖49
清水 130
酵母 2.5 (1/2 茶匙 + 1/4 茶匙)
橄榄油 8

白馒头材料:
中筋面粉250
白砂糖12
温鲜奶130
酵母 2.5 (1/2 茶匙 + 1/4 茶匙)
橄榄油 2

食谱改编自《孟老師的中式面食》

做法:
黑糖面团
1)热水加入黑糖,溶化待凉。
2在盆中加入中筋面粉、酵母、放涼的黑糖水及油拌勻,搓揉至光滑,盖上湿布室溫静置 5 – 10 分钟,然后整形。
白糖面团
3)酵母加入15ml 暖水拌勻,待发泡。
4 在盆中加入中筋面粉、糖、油、发泡酵母、温牛奶搅拌均匀,搓揉至光滑,盖上湿布,静置 5 – 10 分钟,然后整形。
5)用面擀将面团擀成长方形,然后重叠。确保没有气泡。如有气泡,可用细针刺破。
6)排气后,用面擀将两种面团擀成一样大小的面团,白面团上面铺上黑糖面团。在两种面团上喷少许水。(我忘了喷水,不知道是不是因为这样,所以馒头表面像死面。)
7)然后卷起来,分割。放在蒸笼。(我没有蒸笼,所以放在盘子。)
8)放在温暖出醒发20分钟。
9)水沸后蒸15分钟。

Related Posts Plugin for WordPress, Blogger...